Angie Star Jewelry Internship 2010
- Annie Jo

- May 6, 2010
- 6 min read
Updated: Aug 21, 2018
August 21, 2018
Looking Back:
After high school, even during high school, I really didn't understand the importance of jewelry making in my life. I actually thought it was ridiculous and that the world didn't need jewelry or people creating it...I do partially blame my obsession for rock climbing for this. But regardless of what I thought, I loved making jewelry throughout high school. It was very sculptural and the pieces weren't actually very wearer friendly so I just let myself believe that I was a mini sculptor. In collage it was no longer part of my life though and I was only interested in climbing. During my sophomore year at CU Boulder I decided to follow art a bit more closely and got this internship at Angie Star Jewelry. It was so interesting to see the fashion side of the craft and I was so interested in the constant experiments that the jewelry are going through seeing what customers actually want out of their jewelry. Without this internship I fear that I would have missed out on the joy jewelry making brings and the excitement of working with customers and seeing their happiness when they find a piece that truly fits them. It has been a very rewarding journey.
Below is a blog I kept while working at Angie Star, where I learned some new jewelry techniques that I still use today and some other projects they had me work on.
04/07/2010
French Cord Knotting:
When beginning at Angie Star in September the first projects that I began working on where repairs so I ended up doing a lot of French cord knotting. It is tedious, but the end result is worth it! I found out that this technique is not new and is used mainly on pearl necklaces, or necklaces with precious stones so that if the cord breaks none of the beads will be lost.
04/08/2010
Doming:
For the Initial Line I had to punch out many, many little disks and then stamp a letter on each of them, drill a hole for the jump rings, dome all of them, and solder on jump rings. They sell really quickly so I had to make a ton one day in the shop, two of every letter.
04/10/2010
Bailing, a great skill for every jeweler:
Angie taught me how to bail with wire which can be used to create many different beautiful pieces. This technique is nice to know if you don't have access to a torch. This is a perfect and simple cold process that is very simple and elegant.

04/11/2010
The Triple Ring Special Order:
A Special Order was put in for a ring consisting of three bands all connected to each other. Two of the bands were made of sliver and one of copper. I wasn't sure how to even make it, but it actually turned out!

04/13/2010
Pieces to be sold at Angie Star Jewelry:
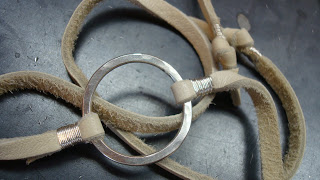
I made two similar pieces that can be warn as either a necklace or bracelet. Each one is made of leather and a large silver jump ring that is textured and brushed back. I really like how they turned out.
04/14/2010
Special Order Domed Pendant:
There was a special order for a piece that one of the Angie Star jewelers designed and I had to re-create it. It was made with a brass dome and a silver dome on top with a circle cut out of its center.

04/15/2010
Unique Pendants for the Shop:
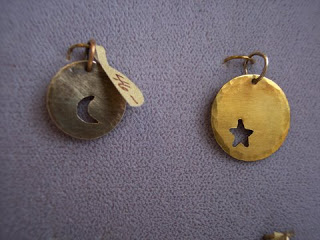
I designed these three celestial pieces and it's been really exciting to see people ordering them!

04/17/2010
Pendants:
Angie had me create many different styles of pendants that people could special order! And they've been selling!
04/21/2010
Square Pendants:
Here are some very unique, handmade, square pendants that I made for the shop's initial line board! The set of golden three pendants are made up of thick brass wire with different stones. The three linked pendant is made up of copper wire, jumprings, and a teardrop stone bead. The top left piece is actually thick sterling silver wire with a stone bead. The bottom two images both consist of pendants made with thick gauge brass wire with sterling silver chain, and semi-precious gemstone beads.
04/23/2010
Recycled Projects:
So I don't know what it is about the silver scrap drawer, but I love going through it and finding things that I can make into something.

The bands for these rings were already made and I just had to solder little designs onto the top of them.
I also found the parts to make all three of these pendants in the silver scrap pile.
04/25/2010
Jewelry Making Hazards:
So while working at Angie Star this year I have learned that it REALLY is IMPORTANT to tie your hair back when on the torch. I managed to burn off half of my bangs while I was soldering a ring. It was kind of scary, flames were all of the sudden in my face and moving up through my hair. I made the entire shop smell. I wish I would have got a picture but I forgot my camera that day.
Then Lindsey, one of the designers, got her hair caught in the drill, but she stopped in time and was fine.
I also managed to smash my finger with a hammer and it started bleeding all over. It was because I was hammering on a very small coin and apparently my aim isn't that precise.
JEWELRY IS DANGEROUS ! ! !

04/26/2010
More Square Pendants:
These are made of copper and brass sheet metal. They are hammered for that lovely, shimmery texture and are slightly domed.

04/27/2010
The Custom Ordered Inuit Eagle Ring:
So... this ring was very difficult for us to make. Lindsey had made the ring but the customer didn't like the eagle's head so Lindsey had to cut it apart and flatten it out. I then had to cut out a different eagle's head and part of the wings. Then I had to heat up the ring enough for the solder to flow and pick the original eagle head off which wasn't to easy. Then I soldered on the new head and stamped the text on the inside of the band. Next I re-form the band into a ring and solder it closed. Then had to file and sand it a bunch to clean it up. To finish the ring, I oxidized the piece and brushed it with the brass brush. I was told that the customer is happy with it.
04/28/2010
The Little Star Pendant:
I had to saw out this little brass star by hand and turn it into a pendant, which was then hung on a sterling silver chain. It was a custom order for a little girl.

05/01/2010
Cute Husbands Getting Gifts for Their Wives:
Many husbands come into Angie Star Jewelry and custom order pendants for their wives with their children's names on them like this one I made.

This husband ordered this piece for his wife and had the names of their children on the disk. The heart hanging in the middle had MAMA stamped on the front and had an infinity symbol, made of silver soldered on the back.

05/02/2010
Personal Pieces Made at Angie Star Jewelry:
I had the opportunity at Angie Star today to make myself a ring! I made the band out of white gold sheet, and also used some silver oxidized wire and a fresh water pearl. I like it a LOT !

And here are a few more pieces I fabricated for myself. One of them was actually the very first thing I designed for myself. It was a necklace made of a piece of old rosary passed down from my great grandma which I attached to some sterling silver chain. With the second piece I used the silk cord knotting technique. The next picture is of a very simple necklace I put together with a stone bead I really like while using the bailing technique. The last two pieces I created were made from New Zealand coins and one Australian coin and some random bits of scrap silver chain. I got the idea from Lindsey Cash, who has made some beautiful pieces out of old coins. I hammered the coins to give them some texture.
P.S. while I was hammering the coins, I hit my thumb as shown in a previous post.
05/03/2010
Increasing a Rings Size:
Today I had to cut open a ring and stretch it apart a bit until it went from a size 9 to a size 11. Then I made a small piece of balled silver, hammered it out, filed it to size, and soldered it onto the ring band.
The blank oval on the ring is the one I fabricated and soldered in.

05/04/2010
The Peace Piece:
On Saturday I had to replicate the silhouette of a hand shape out of silver and also create a little copper disk that had the word PEACE stamped into it. These will later be strung on a necklace with the blue lapis beads.

05/05/2010
The "L" Initial Pendant:
So I was given this project 20 minutes before I had to leave and was in a panic to finish it. Punched out a copper disk, soldered on a large brass jump ring to the edge and stamped an L in the center. Last step was to oxidize and brush back. Voila !

05/06/2010
The Climber Necklace:
I just had to finish this necklace by making the copper pendant with the date stamped into it, and bail both pendants to the chain.


Comments